Contact us today!
(518) 203-2110

Evolve IT

Evolve IT has been serving the Saratoga Springs area since 1995, providing IT Support such as technical helpdesk support, computer support, and consulting to small and medium-sized businesses.

Tip of the Week: How to Save Your Favorite Lock Screen Image to Your Windows 10 PC

Tip of the Week: How to Save Your Favorite Lock Screen Image to Your Windows 10 PC

Have you ever been taken aback by a stunning photo that appears when you lock your Windows 10 PC? While it’s nice to look at, you might notice that this photo changes every now and then. Have you ever seen an image so wonderful that you’ve wanted to download it and make it your desktop image? Well, with this week’s tip, you certainly can!

You may remember how in previous versions of Windows, the lock screen images were stored locally and pulled from a folder on your PC. However, Windows 10 operates a bit differently. It pulls its lock screen images through a feature called Windows Spotlight. This makes finding the files and downloading them rather difficult, but not impossible.

First, you need to open Windows Explorer and click on the View tab. You can find this to the right of Computer. Make sure that you check both the File name extensions and Hidden items boxes.

windows 10 ib 0

Next, you need to copy and paste the file directory we’ve provided into the Windows Explorer file path:

C:\Users\username\AppData\Local\Packages\Microsoft.Windows.ContentDeliveryManager_cw5n1h2txyewy\LocalState\Assets

Notice the “username” in the above link? Make sure that you replace it with whatever your username is and hit Enter. This will bring up a window that is filled with files. These files are the pictures that you’ve been seeing thanks to Windows Spotlight.
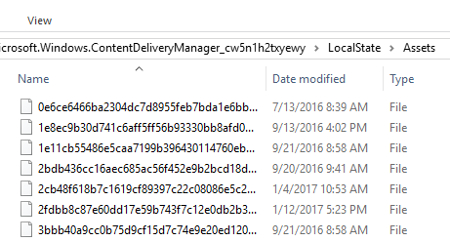
windows 10 ib 1

If you want to put these photos at the top of the list, select the Size tab.

The next step is to make a folder on your hard drive where you will be storing these images. For example, you could place it on your desktop or in Pictures. Once you’ve done this, open the new folder.

It’s now time to move all of these photos to the new folder. This lets you view them at your leisure. Select the files that are larger than 100KB, which you can easily do by selecting the file at the top of the list. You can then hold the Shift key and scroll down to the first file that is greater than 100KB. Once these 30+ files have been selected, you just copy the files with Ctrl+C, and paste them into the new folder using Ctrl+P.
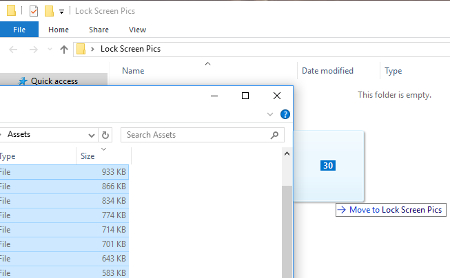
windows 10 ib 2

Be aware that this move will bring up a prompt by Windows Security.
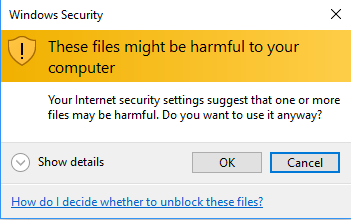
windows 10 ib 3

Don’t worry--it’s safe to click OK. These files won’t harm your computer at all; in fact, they’re already on it!

Now that your files have been copied to the new folder, just rename each one and add a file extension to them so you can view them. To do this, right-click the file and select Rename.
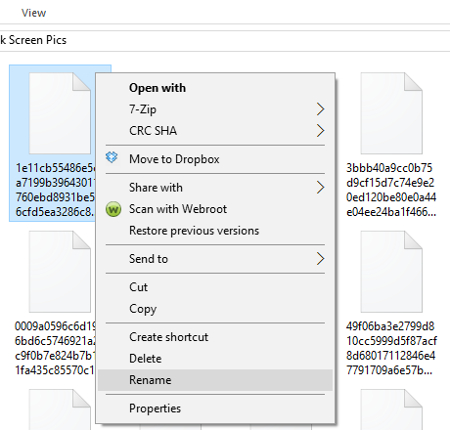
windows 10 ib 4

You can rename the file something simple like 1.PNG. Hit Enter and you’ll see the file’s icon change to a photo. If you’d like, you can click View > Large icons, which makes renaming the files much more manageable.
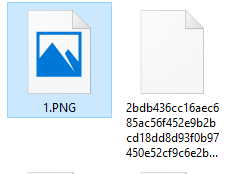
windows 10 ib 5

Now that the file format has been changed, double-click the file and open it to show the image. You can then name the file as you see fit. Since the file is saved on your PC, you can access this folder on a whim.

For more PC tips and tricks, subscribe to Evolve IT’s blog.

Comments

 
No comments made yet. Be the first to submit a comment
Already Registered? Login Here
Guest
Saturday, 21 December 2024
If you'd like to register, please fill in the username, password and name fields.

Captcha Image

Blog Archive

Free Consultation

Sign up today for a
FREE Network Consultation

How secure is your IT infrastructure?
Let us evaluate it for free!

Sign up!

Free Consultation
 

Tag Cloud

Tip of the Week Security Best Practices Technology Internet Hackers Cloud Privacy Email Productivity Business Malware Software Business Computing User Tips Hosted Solutions Microsoft Upgrade Efficiency Workplace Tips Computer Google Windows 10 IT Support Mobile Devices Innovation Smartphone Hardware Network Security Ransomware Gmail Facebook Operating System Microsoft Office Office The Internet of Things Backup Social Media Apps Business Continuity Bandwidth Disaster Recovery Communication Hacking WiFi Network Phishing App Managed Service Provider Outlook Mobile Computing Big Data communications Safety Unified Threat Management Wireless Technology Quick Tips Android Apple Firewall Best Practice Content Filtering Cybercrime Alert Website Networking Data storage Data Windows Experience Smartphones Employer-Employee Relationship Two-factor Authentication History Mobile Device Management Money Small Business Managed IT services Office 365 Business Growth Data Management Advertising Recovery Robot Analytics Society Sports Saving Money Bluetooth Lithium-ion battery Google Wallet Spam intranet Information Technology Running Cable Automation Windows 8 Internet of Things IT Services Memory Hosted Solution Windows XP Social Networking Public Speaking Artificial Intelligence Documents Deep Learning IP Address Tech Support Virtualization Compliance BDR Drones Social Government Vendor Management Augmented Reality Printer Keyboard Browser Wireless Search User Virtual Desktop Hard Drives Unified Communications Securty Monitors Remote Computing Document Management Shortcut Encryption VoIP DDoS Law Enforcement SaaS Heating/Cooling Word Displays Proactive IT Cortana Network Congestion Save Money Business Management End of Support Music Competition Presentation Cryptocurrency Entrepreneur Laptop Writing Domains IBM Google Docs Education Hacker Cleaning Holiday Black Market YouTube Processors Staffing Office Tips Application LiFi Customer Service BYOD Downtime Retail Passwords Streaming Media Help Desk Visible Light Communication Disaster Micrsooft Router
QR-Code